It is not a problem to send large attachments as large as 5 or 10 MB per message in other countries where there is a full ADSL speed and broadband-type fast connection. However, if you are to send email attachment photos to your family and friends in Myanmar it is advisable to resize the photos before sending to them. In most cases the recipients do not receive the photos completely or worst to it, the message does not reach if the recipients use local-run POP3 e-mails i.e., net.mm, com.mm etc. with dial-up connection. Even if those mails are capable of receiving attachments it could literally take from 15-30 minutes to download them which is equivalent to 50 cents to 1 dollar per hour. To make life easier and save time and money for the recipients you can take a 1-minute tutorial on how to simply resize images and photos for e-mail attachments. Anyone with any level of computer knowledge can learn this with in a matter of just one minute. Did you ever say that you are extremely busy to make that stuff and have not time for photo editing? If yes, it here it is. To resize a photo should not take more than 30 seconds.
You’re now on your way to learn how to resize your photo proportionally with 8 simple clicks.
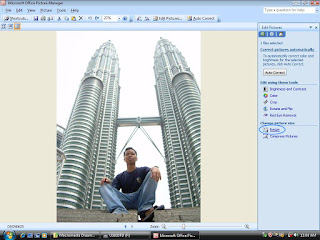
1. Right click on your photo and scroll down to “Open with” and select “Microsoft Office Picture Manager” as shown below.
2. Click on the “Edit Picture” tab.
3. You will then see the properties at the right pane.

4. Click on the “Resize” button and select your desired size. You may choose “Web- large” for e-mail attachment then click on “OK.”

5. You will need to click on the “Save” button. After saving it, you will notice that the size has changed to 95% or 100% in the view panel and the Size Setting will also be different from the original size.
You now have a perfect resized photo ready to send as an attachment with a very small size.
This could probably have been changed to about 250-300 KB from the original full resolution size 1.5 or 2 MB.
Isn’t it easy buddy?
Please visit us at www.zocia.org/forum for more online tutorials.
If you would like to request a tutorial on any technical problem, please feel free to e-mail us at zocia@zocia.org


No comments:
Post a Comment